Metallographic etching selectively alters a polished specimen surface so that grains, phases, boundaries, and other structural features become visible under a metallographic microscope. It does not create the microstructure; it reveals the structure already present in the material.
The correct etching method depends on the alloy, heat-treatment condition, surface-preparation quality, and the feature being evaluated. A polished specimen may be suitable for pores, cracks, and inclusions, while an etched specimen is usually required to examine grain boundaries, phases, weld zones, and heat-treatment structures. Etchants can be hazardous, so a validated procedure, appropriate PPE, a fume hood, compatible containers, and a documented waste-handling route are part of the process—not optional additions.
Choose the right route for your work:
-
Choose an etching method
-
Match an etchant to the material
-
Control etching time and cleaning
-
Troubleshoot uneven or excessive etching
-
Select etching equipment
What Is Metallographic Etching—and What Should It Achieve?
What Is Metallographic Etching?
Polishing prepares a surface; etching reveals contrast.
A polished metallographic specimen can look mirror-bright yet show almost no microstructural detail under reflected light. Etching changes the surface in a controlled, selective way so that different grains, phases, boundaries, and constituents reflect light differently.
In chemical etching, the polished surface reacts with a selected solution. Some regions dissolve more quickly, become rougher, retain reaction products, or develop a thin surface film. These differences create optical contrast. In electrolytic etching, an applied current accelerates or controls the reaction, which can be useful when ordinary chemical etching produces insufficient contrast.
The purpose is not to darken a specimen. A useful etch reveals the feature that supports the inspection decision: grain size, phase distribution, weld structure, carburized case, decarburization, carbides, crack path, or coating interface.
Etching is one step in a broader examination workflow. For an overview of how prepared specimens support material inspection and engineering decisions, read our introduction to metallography and microstructure analysis.
What Is the Purpose of Etching in Metallography?
Etching is used to make microstructural features visible. It supports:
-
Grain-size and grain-boundary assessment.
-
Identification and distribution of phases or constituents.
-
Evaluation of heat-treated structures.
-
Examination of weld metal, fusion lines, and heat-affected zones.
-
Assessment of surface layers such as decarburized or carburized regions.
-
Evaluation of coating interfaces and coating structure.
-
Investigation of cracks, corrosion damage, and local material changes.
Etching should be treated as an analysis step. The correct endpoint depends on the feature being examined, not on a fixed etching time or a preferred visual appearance.
What Can Etching Reveal?
| Feature | What etching helps reveal | Typical examination decision |
|---|---|---|
| Grains and grain boundaries | Grain size, boundary contrast and recrystallized structure | Whether the structure matches the specified condition |
| Phases and constituents | Ferrite, pearlite, martensite, carbides, graphite and other phases | Whether the expected phase distribution is present |
| Welds | Weld metal, fusion line and heat-affected zone | Whether penetration, HAZ width, and weld structure are acceptable |
| Surface layers | Decarburization, carburized case and nitrided layer | Whether case depth or surface condition meets requirements |
| Coatings | Interface condition and coating structure | Whether the coating remains continuous and well supported |
| Corrosion or cracks | Crack path and local damage | Whether the failure mechanism can be interpreted |
When Is Etching Necessary?
Not every metallographic specimen needs etching.
An unetched, well-polished specimen is often appropriate for:
-
Porosity and voids.
-
Non-metallic inclusions.
-
Cracks and fracture-related features.
-
Graphite morphology in cast irons.
-
Some coating-thickness measurements.
-
Certain inclusion-rating procedures.
Etching is usually necessary when the examination requires microstructural contrast. For example, a polished steel specimen may show a crack, but etching may be required to determine whether the crack follows grain boundaries, passes through a particular phase, or is associated with a heat-affected zone.
Metallographic Etching vs. Engraving
| Feature | Metallographic etching | Engraving |
|---|---|---|
| Purpose | Reveal microstructure | Create visible markings or patterns |
| Mechanism | Selective chemical or electrochemical reaction | Mechanical, laser, or physical removal |
| Typical depth | Usually microscopic | Often visible without magnification |
| Main output | Microstructural contrast | Letters, logos, patterns or identification |
| Quality criterion | Reproducible analytical contrast | Legible and durable marking |
Do not use decorative or industrial marking etchants as substitutes for a validated metallographic etchant. The two applications may use similar chemistry, but their objectives, formulations, controls, and acceptance criteria differ.
Before Etching: Verify the Polished Surface and Define the Analysis Target
Inspect the Polished Surface Before Etching
Etching cannot correct a poor polished surface. Before applying an etchant, inspect the specimen for:
-
Deep scratches.
-
Smearing or dragged material.
-
Embedded abrasive particles.
-
Pull-out around hard particles or brittle phases.
-
Rounded edges.
-
Residual polishing compound.
-
Water marks or dried residue.
-
Inadequate exposure of the region to be examined.
A useful rule is simple: if the polished surface contains an artifact that would interfere with interpretation, resolve it before etching. Etching may make a preparation defect more visible, but it will not remove it.
If deep scratches, smearing, or embedded abrasive particles remain after polishing, address them before etching. Our guide to metallographic grinding sequence and process control explains how to assess scratch removal, select abrasives, and define a suitable handover condition.
For edge-sensitive specimens, also check the resin–specimen interface. A gap or inadequate support can contribute to edge rounding and uneven preparation. Our guide to mounting methods and edge retention explains how mounting method, resin selection, and cooling or curing conditions affect edge support.
If the specimen repeatedly arrives with burns, cracks, or coating damage, review the sectioning process before changing the etching method. Our guide to low-damage metallographic cutting explains how cutting wheels, coolant, clamping, and feed conditions influence the specimen delivered to later preparation.
Why Residual Polishing Liquid or Water Causes Uneven Etching
Residual polishing suspension, cleaning solution, fingerprints, oils, and water films can interfere with the etching reaction. They may create local differences in wetting, reaction rate, or corrosion-product formation.
The result is often uneven etching: one region appears correctly contrasted while another remains bright, becomes too dark, or develops stains. A specimen should therefore be clean and dry before etching. ASTM E3 guidance specifically identifies greases, oils, coolants, and residue from materials or etchants as contaminants that must be removed during specimen preparation.
Identify the Microstructural Feature You Need to Reveal
Define the examination target before selecting an etchant:
-
Grain boundaries.
-
Phases.
-
Carbides.
-
Weld heat-affected zone.
-
Decarburization.
-
Coating interface.
-
Corrosion damage.
-
Crack path.
A single etchant does not necessarily reveal every feature equally well. For example, an etchant that gives useful grain-boundary contrast may not provide the best contrast for a fine carbide distribution or a coating interface.
Set the Etching Endpoint Around the Examination Task
| Examination objective | Practical etching endpoint |
|---|---|
| General grain structure | Clear, controlled grain contrast |
| Fine detail or high magnification | Shallow etch that preserves fine features |
| Weld HAZ evaluation | Clear fusion line and HAZ contrast |
| Coating interface | Intact interface without excessive attack |
| Failure analysis | Crack path and fracture evidence remain interpretable |
Metallographic Etching Methods: Chemical, Electrolytic and Thermal
Chemical Etching: Immersion or Swab Etching
Chemical etching is the most common route for routine metallographic examination. The polished specimen is exposed to a selected etchant by immersion or swabbing.
Immersion etching generally provides more uniform exposure because the entire prepared face contacts the solution under controlled conditions. It is often preferred when reproducibility and consistent coverage are important.
Swab etching uses a suitable applicator to apply the etchant to the specimen surface. It can be useful for localized examination or when the procedure calls for it, but inconsistent pressure, speed or applicator condition can create uneven results. Swabbing can create uneven etching if not performed consistently, while immersion may provide more uniform results but can require longer exposure.
Electrolytic Etching: Controlled Contrast Through Current
Electrolytic etching uses an electrolyte, an applied voltage or current, and a suitable electrode arrangement. The electrical condition can accelerate the reaction and provide another control variable for contrast.
This method can be useful when chemical etching produces insufficient contrast, when selective phase contrast is required, or when a material responds poorly to conventional chemical etching. It also introduces additional variables: electrolyte compatibility, specimen geometry, electrode spacing, voltage, current density, and exposure time.
Electrolytic etching should be validated on representative specimens. A method that works well on one alloy, heat-treatment condition, or specimen geometry cannot automatically be transferred to another without verification.
Thermal Etching: When Heat-Assisted Contrast Is Considered
Thermal etching uses controlled heating, often in a controlled atmosphere, to develop microstructural contrast. It is not a routine substitute for chemical or electrolytic etching and should only be considered when the material and examination objective justify it.
The main controls are temperature, time, atmosphere, and cooling conditions. Thermal etching can alter the surface or microstructure if the selected conditions are too aggressive, so it requires validation and careful documentation.
Macro Etching vs. Micro Etching
| Method | Observation scale | Typical use | Main output |
|---|---|---|---|
| Macro etching | Low magnification or unaided eye | Welds, macro defects, flow lines, segregation | Visible macrostructural features |
| Micro etching | Metallographic microscope | Grains, phases, HAZ and fine constituents | Microstructural contrast |
Macro etching examines larger-scale features such as weld penetration, porosity, segregation, flow lines, and gross structural variation. Micro etching examines the fine structure that determines mechanical behavior, heat-treatment response, and local failure mechanisms.
Chemical Etching vs. Electrolytic Etching
| Factor | Chemical etching | Electrolytic etching |
|---|---|---|
| Driving mechanism | Chemical reaction | Applied electrical current |
| Main controls | Etchant, time, temperature and agitation | Electrolyte, voltage/current, time and geometry |
| Typical strength | Straightforward routine examination | Greater control where chemical contrast is limited |
| Main selection issue | Material and feature compatibility | Electrolyte and electrical-condition compatibility |
| Main risk | Over-etching and inconsistent reaction | Selective attack and process-dependent variation |
When to Consider Thermal Etching
Consider thermal etching only when:
-
The material is known to respond to heat-assisted contrast development.
-
Chemical or electrolytic methods do not reveal the required feature.
-
The laboratory can control atmosphere, temperature, and time.
-
The procedure has been validated on representative specimens.
Do not use thermal etching simply because chemical etching is inconvenient. Heat can change the surface condition and may obscure the evidence needed for the examination.
A Decision Matrix for Selecting an Etching Method
Routine Optical Microstructure Examination
For many routine examinations, chemical etching is the first route to evaluate. It is generally simpler to control, document, and reproduce when the etchant, exposure time, and cleaning method are defined.
Weld and Heat-Affected-Zone Examination
Weld examination often requires contrast across base metal, weld metal, fusion line, and HAZ. Macro etching may be used to assess weld geometry and gross defects, while micro etching is used to examine the HAZ and weld microstructure.
Materials That Respond Poorly to Chemical Etching
If a material produces weak or inconsistent contrast under chemical etching, evaluate electrolytic etching. Validate the electrolyte, electrical condition, and exposure time on a representative specimen before adopting the method.
High-Magnification or Fine-Feature Analysis
For high-magnification work, avoid over-etching. A shallow etch that preserves fine detail is usually more useful than a dark, heavily attacked surface.
Failure Analysis and Crack-Path Examination
In failure analysis, etching must not obscure the crack path or destroy fracture-related evidence. Use the minimum etching required to reveal the relevant structure, and preserve the unetched condition when crack morphology or fracture features are the primary evidence.
How to Select a Metallographic Etchant
Why Etchant Selection Depends on Material and Feature
Etchant selection depends on more than the base metal. The same alloy can respond differently after cold work, annealing, quenching, tempering, welding, or surface treatment.
Consider:
-
Alloy system and grade.
-
Heat-treatment condition.
-
Cold work or deformation history.
-
Target phase or constituent.
-
Required observation magnification.
-
Etching method.
-
Safety and chemical compatibility.
-
Waste-handling requirements.
A practical etching method specifies the etchant, application method, exposure condition, rinsing method, drying method, and acceptance criterion. It should not state only “etch for 10 seconds.”
Etchants for Steel, Stainless Steel and Alloy Steels
Steel etching often focuses on ferrite, pearlite, martensite, bainite, carbides, grain boundaries, and heat-affected zones. The appropriate approach changes substantially between low-carbon steel, hardened steel, alloy steel, and stainless steel.
For carbon and alloy steels, etchant selection may need to distinguish ferrite and pearlite, reveal martensite or bainite, show carbides, or define grain boundaries. For stainless steels, the examination may focus on austenite, ferrite, carbides, sensitization, weld structure, or duplex-phase balance.
Do not assume that one steel etchant is suitable for every steel grade or heat-treatment condition. Validate the result on a representative specimen and compare it with the required acceptance criterion.
Etchants for Aluminum Alloys
Aluminum alloy etching often needs to reveal grain boundaries, second phases, cast structure, heat-treatment effects, and local deformation. Aluminum surfaces can also be sensitive to residual polishing compound, water films, and surface contamination.
For aluminum, start with a short exposure and inspect the result before extending the etch. Over-etching can obscure fine details and create pitting; reducing exposure time or diluting the etchant are common corrective actions.
Etchants for Copper Alloys, Bronze and Brass
Copper alloys may require etching to reveal grains, annealing structure, phases, inclusions or corrosion-related features. Bronze and brass can show different responses depending on alloy composition, deformation history and heat treatment.
A useful approach is to define the feature first. Grain-boundary contrast, phase identification and corrosion-product examination may require different conditions, even within the same broad alloy family.
Etchants for Titanium, Nickel-Based Alloys and Superalloys
Titanium alloys, nickel-based alloys and superalloys often require more material-specific etching methods. The examination may focus on alpha/beta phases, grain boundaries, precipitates, carbides, heat-treatment effects, or weld structure.
These materials should not be treated as interchangeable with steel or aluminum. Use a validated method for the specific alloy system and verify that the etch reveals the intended feature without excessive attack.
Color Etchants: When Tint Etching Is Useful
Color etchants can create contrast through selective film formation or deposition. They may be useful when conventional etching does not adequately distinguish phases or constituents.
Color etching is not automatically better than conventional etching. It can be useful for selected phase-identification tasks, but it requires validation, controlled application, and repeatable interpretation. Do not use color as the sole acceptance criterion without confirming that the observed contrast corresponds to the required microstructural feature.
What to Request from an Etchant Supplier
Ask for:
-
Applicable alloy systems and heat-treatment conditions.
-
Recommended application method: immersion, swab, or electrolytic.
-
Recommended exposure conditions and endpoint guidance.
-
Chemical compatibility and storage requirements.
-
Safety data sheet and hazard information.
-
Shelf life, batch traceability and storage conditions.
-
Waste-handling and disposal guidance.
-
Recommended rinsing and drying procedure.
-
Known limitations or materials where the etchant is unsuitable.
A supplier that cannot explain these points should not be selected based on price alone.
How to Etch a Metallographic Sample: Before, During and After
Before Etching: Confirm the Polished Surface Is Clean and Dry
Confirm that the polished surface is free from:
-
Polishing suspension.
-
Cleaning solution.
-
Water films.
-
Fingerprints.
-
Oils or grease.
-
Dried residue.
-
Embedded abrasive particles.
Dry the specimen completely before etching. Residual liquid can cause uneven wetting and inconsistent reaction across the prepared face.
Before etching, confirm that the polished surface is free from residual polishing suspension, cleaning solution, and water films. Use a polishing consumable and cleaning routine that leave the prepared surface clean, dry, and ready for etching.
During Etching: Control Method, Time, and Agitation
Use the approved application method:
-
Immersion for uniform exposure.
-
Swabbing when the procedure specifically requires it.
-
Electrolytic etching when chemical etching does not provide the required contrast.
Control exposure time, temperature where relevant, agitation or swabbing motion, and the freshness of the etchant. Do not allow the etchant to dry on the specimen surface.
After Etching: Rinse, Displace and Dry Correctly
Use a repeatable sequence:
Immediate rinse → Alcohol displacement → Filtered forced-air drying
Rinse immediately at the etching endpoint. Do not let the etchant remain on the surface or air-dry. After rinsing, displace water with a suitable alcohol and dry using clean, filtered forced air or warm air as appropriate for the procedure.
Published etching guidance recommends immediate water rinsing at the endpoint, displacement with ethanol, and drying with warm forced air; allowing the etchant to air-dry can leave residue or staining.
How to Control Etching Time
Use a staged approach:
-
Start with a short exposure.
-
Rinse, displace, and dry.
-
Inspect under the microscope.
-
Repeat only if the required feature is not visible.
-
Record the total effective exposure and conditions.
Do not use a fixed time as the sole endpoint. The same nominal time can produce different results when etchant strength, temperature, agitation, surface condition, or specimen geometry changes.
When to Repeat, Repolish or Change the Etchant
| Result | Practical response |
|---|---|
| Under-etched | Repeat with a controlled increase in exposure, after confirming the etchant and method |
| Over-etched | Repolish through the final polishing step and re-etch with a shorter exposure |
| Uneven etching | Check cleanliness, drying, application method, and etchant condition |
| Poor contrast despite correct exposure | Review whether the etchant matches the alloy and target feature |
| Pitting or excessive attack | Reduce exposure, dilute where the procedure allows, or change the etchant |
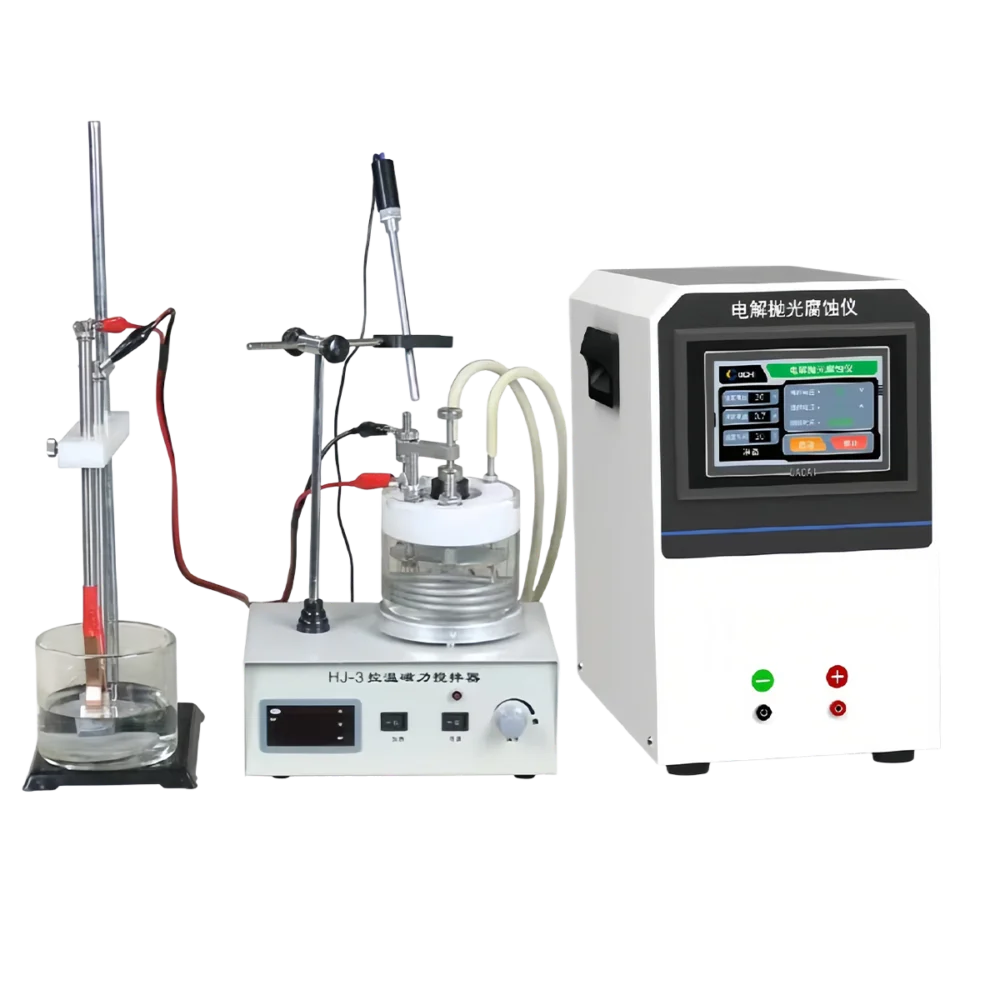
Match Electrolyte Compatibility and Specimen Geometry
Confirm that the machine, electrolyte, and specimen geometry are compatible. Electrode spacing, specimen shape, and exposed area affect the electrical condition.
Compare Voltage, Current and Process Control
Compare voltage range, current control, timer control, electrolyte compatibility, and repeatability. Do not select equipment based on maximum voltage alone.
Evaluate Rinsing, Drainage and Cleaning Requirements
Evaluate rinsing, drainage, and cleaning requirements. Confirm that the machine can be cleaned and maintained without creating cross-contamination.
What to Require in a Supplier Demonstration
Require a demonstration using a representative specimen, the intended electrolyte, and the actual examination feature. Do not accept a generic demonstration on an unrelated material.
When Is Manual Swab Etching Sufficient?
Manual swab etching can be sufficient for low-volume work, localized examination, or procedures that specifically call for it. It becomes less attractive when repeatability, throughput, or operator-to-operator variation becomes a limitation.
If manual swab etching becomes a bottleneck because of specimen volume, repeatability, or operator variation, review the metallographic sample preparation equipment configuration. The appropriate solution may involve polishing, electrolytic etching, or a combination of process controls rather than a single equipment purchase.
What Is the Real Cost per Analytically Acceptable Etched Specimen?
Include Etchant, Labor, Rework, and Repeat Analysis
Calculate the full cost per accepted specimen, including etchant, labor, rework, repeat analysis, and disposal.
Track First-Pass Acceptance and Hands-On Time
Track first-pass acceptance and hands-on time. A low-cost etchant that requires frequent rework may cost more per accepted specimen than a higher-cost etchant with better repeatability.
Compare Etchant Cost per Accepted Specimen
Compare etchant cost per accepted specimen, not per bottle. Include waste, disposal, and rework in the calculation.
Build a Clearly Labeled Purchase-Justification Example
Build a clearly labeled purchase-justification example using your actual throughput, labor rate, rework rate, and disposal cost. Do not use generic savings claims.
Decide Whether to Change the Etchant, Method, or Equipment
Decide whether to change the etchant, method, or equipment based on the actual limitation: contrast, repeatability, safety, throughput, or operator workload.
Metallographic Etching FAQ
Does Every Metallographic Specimen Need Etching?
No. Unetched specimens are often appropriate for pores, cracks, inclusions, and some coating measurements. Etching is needed when microstructural contrast is required.
Is Etching the Same as Corrosion?
No. Etching is a controlled, selective surface reaction used to reveal microstructure. Corrosion is uncontrolled material degradation.
Which Etchant Should You Use for Steel?
It depends on the steel grade, heat-treatment condition, and feature being examined. Do not use one etchant for all steel types.
Which Etchant Should You Use for Aluminum?
It depends on the alloy and examination objective. Start with a short exposure and increase only if needed.
How Long Should You Etch a Metallographic Sample?
There is no universal time. Start short, inspect, and increase only in controlled increments.
Can You Use the Same Etchant for Stainless Steel and Carbon Steel?
Not automatically. The alloy systems and examination objectives differ.
Does Etching Damage the Specimen?
Etching alters the surface to reveal contrast. Over-etching can obscure detail or create pitting.
Can You Etch a Specimen More Than Once?
Yes, but repeated etching can lead to over-etching. Repolish and re-etch with a shorter exposure if needed.
When Is Electrolytic Etching Better Than Chemical Etching?
Electrolytic etching can be better when chemical etching produces insufficient contrast or when controlled electrical conditions are required.
What Is the Next Step After Etching?
Inspect the specimen under the metallographic microscope and evaluate whether the required feature is visible and interpretable.
Choose an Etching Method Around the Feature You Need to Reveal
Request an Etching Method and Equipment Recommendation
Uneven etching, poor contrast, or over-etched microstructure? Send us your specimen material, heat-treatment condition, target feature, current polishing method, and intended analysis. We can help evaluate suitable etching methods, equipment, and process controls for your laboratory requirements.